
Self-hosted Gitlab Runners on AKS, with Managed Identities
This post is long overdue, I've been meaning to write this for a long time but did not get around to doing it. So here goes!
The code used in this post is located in https://gitlab.com/ascodenl/gitlab-runner-aks
The great thing about using Managed Identities in Azure is that they cannot be (ab)used to run elsewhere, like Service Principals can. Yes, you can use workload identities conditional access policies nowadays, but SP's are basically just another username/password combination that can be abused for other purposes than they were meant for. Managed Identities are a special type of Service Principal (which is an Azure Enterprise Application Registration under the hood) that can only be used when attached to an Azure resource. When connected to a Kubernetes service account, the managed identity permissions can be assumed by the pod that has that service account attached. This allows for fine-grained permissions for specific purposes, for specific Gitlab runners. For example, a runner that is purpose-built for building container images that pushes to Azure Container Registry - using a Managed Identity that only has the AcrPush permission on the ACR(s) it needs to push to.
The case for self-hosted Gitlab Runners
"Why not use the Gitlab provided runners"? I hear that quite often. In summary, self-hosted GitLab runners are ideal when you need maximum control, security, and flexibility for your CI/CD jobs, want to optimize costs at scale, or have specific compliance and infrastructure requirements that (what Gitlab calls) Instance runners cannot meet. Yes, it requires maintenance but it outweighs the added benefits - especially in environments with heavy compliance requirements like the Financial industry.
Slightly more detailed, for several reasons:
1. Full Control Over the Build Environment
- Self-hosted runners give complete control over the (virtual) hardware, operating system, and software installed on the machines (in our case, Kubernetes) running CI/CD jobs. This allows you to customize environments to match your production setup, install proprietary or legacy tools, and fine-tune performance for specific workloads.
2. Security and Compliance
- By running jobs on your own infrastructure, you can ensure sensitive code and data never leave your network. This is especially important for organizations with strict compliance, data residency, or privacy requirements, such as those in the public sector.
- Self-hosted runners can be placed behind firewalls or VPNs, further reducing exposure to potential threats.
3. Cost Efficiency and Scalability
- For teams with high CI/CD usage, self-hosted runners can be more cost-effective than paying for shared or cloud-hosted runners, especially at scale. You avoid per-minute billing and can utilize existing cloud resources as needed.
- You can scale your runners as your needs grow.
4. Performance and Flexibility
- Self-hosted runners can be optimized for your specific workloads, providing faster builds and more reliable performance than shared runners.
- You can run jobs on specialized hardware (e.g., GPUs, large-memory machines) or in specific environments (e.g., on-premises, in particular cloud regions) that aren't available with GitLab-hosted runners.
5. Advanced Customization
- You can create custom caching strategies, use local Docker registries, or integrate with internal systems and services that aren't accessible from public runners.
- Self-hosted runners allow for advanced monitoring, logging, and debugging, giving greater visibility into CI/CD processes.
Types of runners
Gitlab has 3 types of runners:
- Instance runners: Shared runners that are built, deployed and managed by Gitlab for generic use.
- Group runners: Deployed on Gitlab group level, inherited by all repositories (projects) that are part of that group. Self-hosted and self- managed.
- Project runners: Deployed on a single repository. Self-hosted and self-managed.
Types of runtime environments
When registering a GitLab runner, you must select an executor, which determines the environment in which your CI/CD jobs will run. Each executor offers different levels of isolation, scalability, and compatibility, making them suitable for various scenarios.
| Executor | Isolation | Typical Use Case | Pros | Cons |
|---|---|---|---|---|
| Shell | Low | Simple, local jobs | Easy, minimal setup | Low isolation, less secure |
| Docker | High | Reproducible, isolated builds | Clean, scalable, supports services | Needs Docker, some limits |
| Docker Autoscaler | High | Scalable cloud builds | Auto-scales, cloud support | Complex setup |
| Instance | Very High | Full VM per job, high isolation | Max isolation, flexibility | Resource intensive |
| Kubernetes | High | Cloud-native, Kubernetes environments | Scalable, cloud integration | Needs Kubernetes |
| SSH | Varies | Remote, legacy, or custom environments | Remote execution | Limited support |
| VirtualBox/Parallels | High | VM-based isolation on local hardware | Good isolation | Slower, needs virtualization |
| Custom | Varies | Anything not covered above | Flexible | Requires custom scripts |
Choosing the right executor depends on your project's requirements for isolation, scalability, environment, and available infrastructure.
Our default platform of choice is Kubernetes, this article covers the Azure implementation of Kubernetes called Azure Kubernetes Service (AKS)
Creating infrastructure in Azure (or any environment for that matter) is done using Infrastructure as Code (IaC). The tool of choice is Terraform or Tofu, whatever your preference. The idea is to let a CI/CD pipeline handle the creating, updating and destruction of Azure resources, using Gitlab Runners on AKS. For this, we need several resources to make that happen.
Here is a quick overview of what we are building:
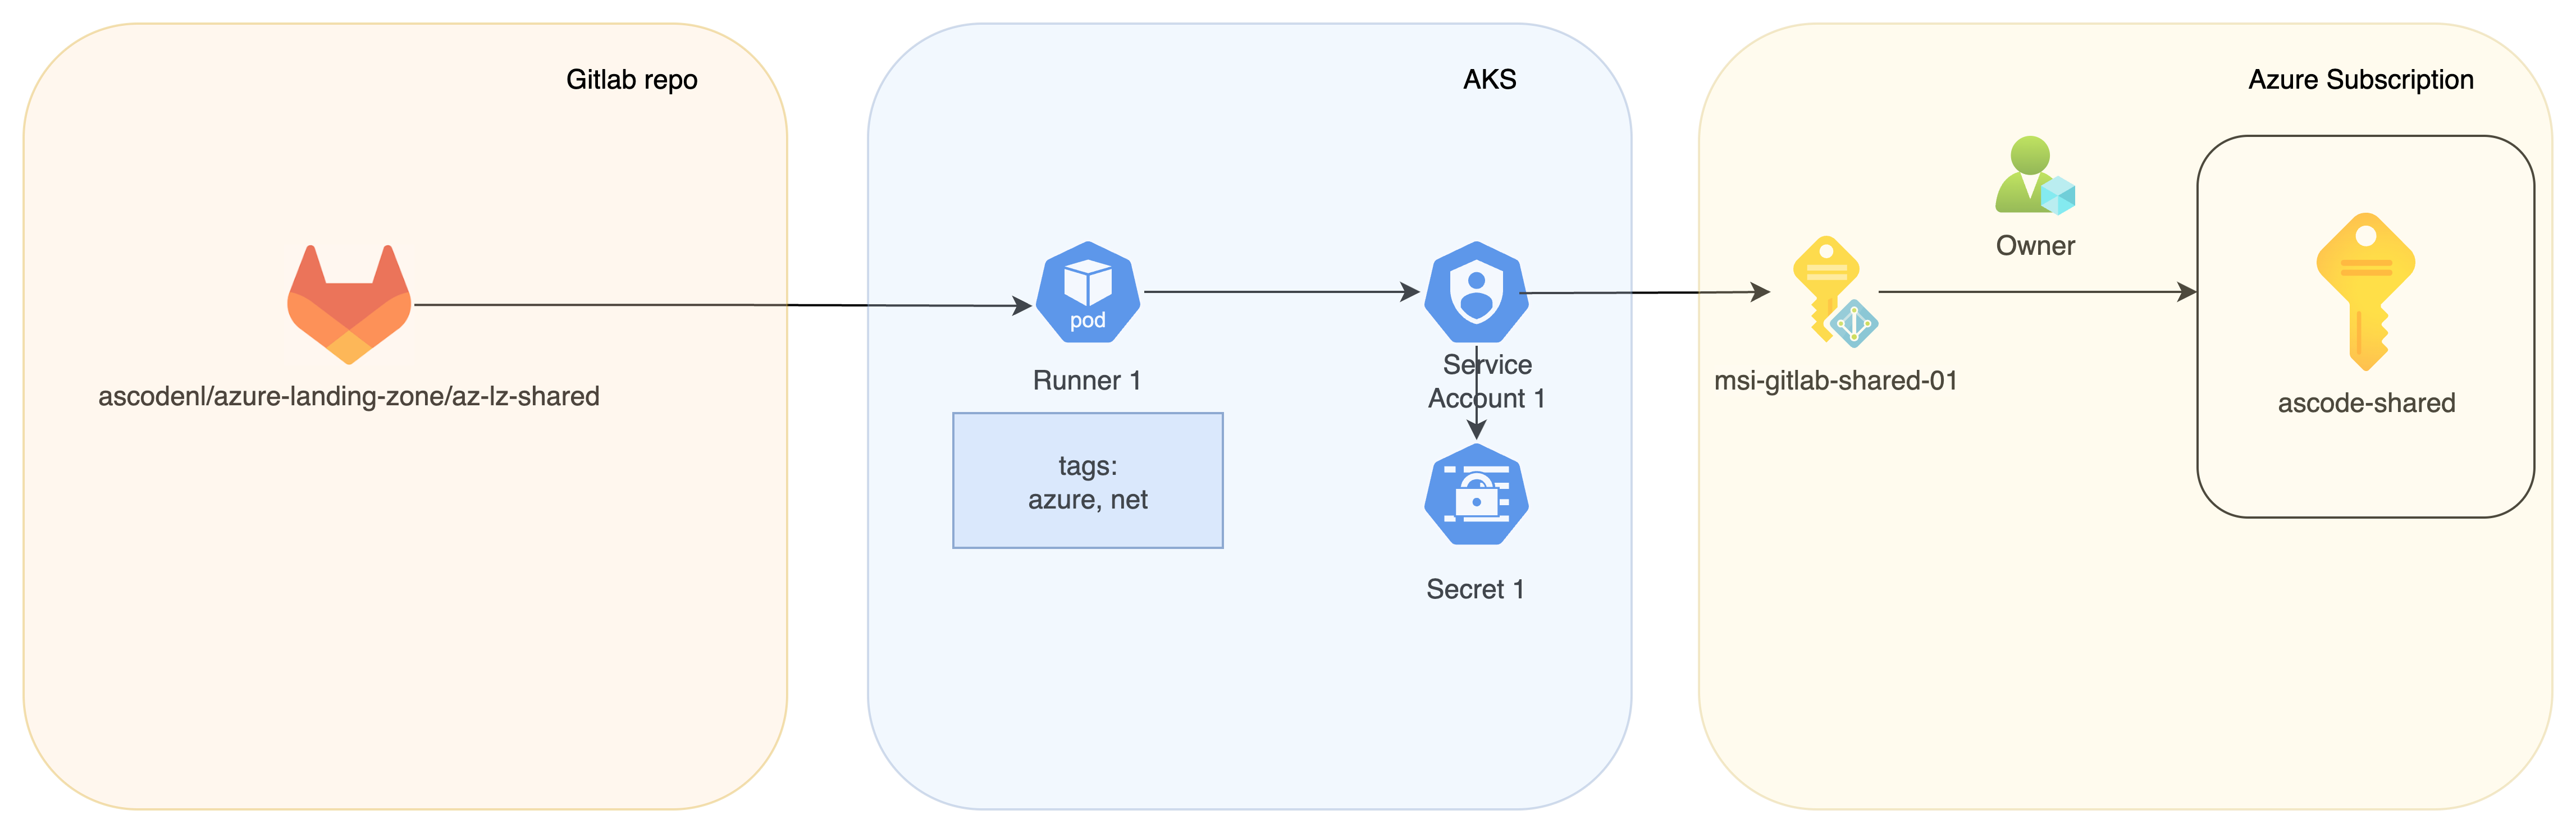
Azure configuration
The runner will use a Kubernetes Service account, which is "connected" to an Azure Managed Identity, that will be assigned roles with permissions to create resources in Azure. You will need an AKS cluster with OIDC issuer enabled. Read here how to enable if not configured yet.
The Managed Identity is created as a separate resource outside of any Terraform Module. The main reason for this is, we use RBAC to assign permissions on Azure Resources. If you want to allow a Managed Identity access to Entra ID (to read groups, primarily), assigning permissions in Entra ID requires elevated privileges that we do not want to delegate to a Managed Identity. To prevent (re)creation of a Managed Identity as part of a module, we create it separately.
locals {
  runners = {
    tf = {
      environment      = "ss"
      environment_long = "shared"
      runner_type      = "group_type"
      runner_tags      = ["azure", "platform", "ss"]
      repo_path        = "ascodenl/infra"
      run_privileged   = "true"
      purpose          = "Runner for deploying Terraform resources in the Azure Landing Zone using Gitlab"
    }
# view more in the complete command sequence
Click to see complete Terraform code
locals {
  runners = {
    tf = {
      environment      = "ss"
      environment_long = "shared"
      runner_type      = "group_type"
      runner_tags      = ["azure", "platform", "ss"]
      repo_path        = "ascodenl/infra"
      run_privileged   = "true"
      purpose          = "Runner for deploying Terraform resources in the Azure Landing Zone using Gitlab"
    }
    packer = {
      environment      = "ss"
      environment_long = "shared"
      runner_type      = "project_type"
      runner_tags      = ["infra-packer-azure", "ss"]
      repo_path        = "ascodenl/infra/base-images/azure"
      run_privileged   = "true"
      purpose          = "Gitlab runner for deploying Custom images to Shared Imaged Gallery using Packer in Azure"
    }
  }
}

resource "azurerm_user_assigned_identity" "gitlab_runner" {
  for_each            = local.runners
  name                = "${each.value.region_code}-${each.value.environment}-msi-gitlab-${each.key}"
  resource_group_name = azurerm_resource_group.gitlab[each.value.region_code].name
  location            = azurerm_resource_group.gitlab[each.value.region_code].location
  tags = merge(local.tags, {
    purpose = each.value.purpose
  })
  lifecycle {
    ignore_changes = [tags["CreatedOnDateTime"]]
  }
}

##
## Create the MSGraph application
##

data "azuread_application_published_app_ids" "well_known" {}

resource "azuread_service_principal" "msgraph" {
  client_id    = data.azuread_application_published_app_ids.well_known.result.MicrosoftGraph
  use_existing = true
}

##
## Assign the Permissions in Entra ID
##

resource "azuread_app_role_assignment" "gitlab_api_permissions" {
  for_each            = toset(["Group.Read.All", "User.Read.All", "GroupMember.Read.All", "Directory.Read.All"])
  app_role_id         = azuread_service_principal.msgraph.app_role_ids[each.key]
  principal_object_id = azurerm_user_assigned_identity.gitlab_runner["tf"].principal_id
  resource_object_id  = azuread_service_principal.msgraph.object_id
}

##
## Create a federated credential
##

resource "azurerm_federated_identity_credential" "gitlab_runner" {
  for_each            = local.runners
  name                = "ascode-${each.value.environment_long}-msi-gitlab-${each.key}-cred"
  resource_group_name = azurerm_resource_group.gitlab.name
  audience            = ["api://AzureADTokenExchange"]
  issuer              = module.aks.oidc_issuer_url
  parent_id           = azurerm_user_assigned_identity.gitlab_runner[each.key].id
  subject             = "system:serviceaccount:${module.runners[each.key].k8s_sa_namespace}:${module.runners[each.key].k8s_sa_name}"
}

##
## Assign permissions in Azure
##

# MSI is owner on all subscriptions
resource "azurerm_role_assignment" "gitlab_runner_platform_owner" {
  for_each             = local.subscription_id
  scope                = "/subscriptions/${each.value}"
  role_definition_name = "Owner"
  principal_id         = azurerm_user_assigned_identity.gitlab_runner["tf"].principal_id
}
Note that we make the MSI specific to deploying Terraform resources (azurerm_user_assigned_identity.gitlab_runner["tf"].principal_id) owner of the subscriptions. Contributor is not going to be enough as we also want to use the pipeline to do role assignments and RBAC, therefor it needs owner permissions.
⚠️ Warning: This means that this MSI has very powerful privileges! Make sure you lock down your pipelines so that not just anyone can run them and make sure you do proper Merge Requests and code reviews!
Kubernetes resources
Remember we are using Kubernetes as the Gitlab Executor. What we are deploying is what can be described as a "runner manager", which will spin off containers (pods, actually) that will run the pipeline. Once the pipeline is finished, the pod is destroyed.
The Gitlab Runner is deployed using Helm. Gitlab maintains a Helm chart that you can find on https://gitlab.com/gitlab-org/charts/gitlab-runner/.
Gitlab Runner configuration is done in a config.toml file that we deploy using a template.
gitlabUrl: "${gitlab_url}"
unregisterRunners: true
terminationGracePeriodSeconds: 3600
concurrent: 10
checkInterval: 30
serviceAccountName: ${rbac_service_account_name}
# view more in the complete configuration
Click to see GitLab Runner Helm Values Configuration
gitlabUrl: "${gitlab_url}"
unregisterRunners: true
terminationGracePeriodSeconds: 3600
concurrent: 10
checkInterval: 30
serviceAccountName: ${rbac_service_account_name}
rbac:
  create: false
serviceAccountAnnotations: {
    azure.workload.identity/client-id: ${client_id},
    azure.workload.identity/tenant-id: ${tenant_id}
}
metrics:
  enabled: true
runners:
  config: |
    [[runners]]
      [runners.kubernetes]
        pod_labels_overwrite_allowed = ".*"
        privileged = ${run_privileged}
        service_account = "${service_account_name}"
        namespace = "${runner_namespace}"
      [runners.kubernetes.pod_labels]
        "azure.workload.identity/use" = '"true"'
      [[runners.kubernetes.volumes.empty_dir]]
        name = "docker-certs"
        mount_path = "/certs/client"
        medium = "Memory"
  name: "${gitlab_name}"
  image: "${gitlab_docker_image}"
  privileged: ${run_privileged}
  serviceAccountName: ${service_account_name}
  pull_policy: always
  secret: "${runner_secret}"
securityContext:
  runAsUser: 100
deploymentLabels: {
  deployment_repository: ${deployment_repo_path}
}
podLabels: {
    azure.workload.identity/use: "true"
}
Then we use Terraform to tranform the template and deploy the Helm chart:
locals {
  gitlab_runner_vars = {
    gitlab_url                = var.gitlab_url
    gitlab_docker_image       = var.gitlab_docker_image
    gitlab_name               = "${var.environment}-k8-${var.runner_name}"
# view more in the complete chart
Click to see Terraform deploy Helm Chart
locals {
  gitlab_runner_vars = {
    gitlab_url                = var.gitlab_url
    gitlab_docker_image       = var.gitlab_docker_image
    gitlab_name               = "${var.environment}-k8-${var.runner_name}"
    run_privileged            = var.run_privileged
    service_account_name      = kubernetes_service_account_v1.gitlab_runner.metadata[0].name
    rbac_service_account_name = kubernetes_service_account_v1.gitlab_runner.metadata[0].name
    runner_namespace          = kubernetes_namespace_v1.gitlab.metadata[0].name
    client_id                 = var.mi_client_id
    tenant_id                 = var.tenant_id
    runner_secret             = kubernetes_secret_v1.gitlab_runner.metadata[0].name
    deployment_repo_path      = var.deployment_repo_path
  }
}

resource "helm_release" "gitlab_runner" {
  chart            = "gitlab-runner"
  name             = "${var.customer_tla}-${var.environment}-${var.runner_name}"
  namespace        = kubernetes_namespace_v1.gitlab.metadata[0].name
  repository       = "https://charts.gitlab.io"
  version          = var.gitlab_runner_helm_release_version
  create_namespace = false

  values = [
    templatefile("${path.module}/templates/runner-values.yml.tpl", local.gitlab_runner_vars)
  ]
}
To check for the latest version(s) of the chart:
helm repo add gitlab-runner https://charts.gitlab.io
helm repo update
helm search repo-l gitlab/gitlab-runner | head -5
The last part is to create the Kubernetes Service Account that "glues" the Managed Identity to the Gitlab Runner:
resource "kubernetes_service_account_v1" "gitlab_runner" {
  metadata {
    name      = "gitlab-runner-${random_id.this.hex}"
    namespace = kubernetes_namespace_v1.gitlab.metadata[0].name
    annotations = {
      "azure.workload.identity/client-id" = var.msi_client_id
      "azure.workload.identity/tenant-id" = var.tenant_id
    }
    labels = {
      "azure.workload.identity/use" = "true"
    }
  }
}
Finally some required Kubernetes resources to make this all work (I use rbac.create = false in the config.toml because I like to be in control of what is created. Setting this to true means you have to annotate the Service Account with the correct values as it gets auto-created).
resource "kubernetes_namespace_v1" "gitlab" {
  metadata {
    name = "gitlab-${random_id.this.hex}"
  }
}
# view more in the complete Kubernetes resources
Click to see Terraform Kubernetes resources
resource "kubernetes_namespace_v1" "gitlab" {
  metadata {
    name = "gitlab-${random_id.this.hex}"
  }
}

resource "kubernetes_role" "gitlab" {
  metadata {
    name      = "gitlab-runner-${random_id.this.hex}"
    namespace = kubernetes_namespace_v1.gitlab.metadata[0].name
  }
  rule {
    api_groups = [""]
    resources  = ["configmaps", "pods", "pods/attach", "secrets", "services", "namespaces"]
    verbs      = ["get", "list", "watch", "create", "patch", "update", "delete"]
  }
  rule {
    api_groups = [""]
    resources  = ["pods/exec"]
    verbs      = ["create", "patch", "delete"]
  }
  rule {
    api_groups = [""]
    resources  = ["serviceAccounts"]
    verbs      = ["get"]
  }
}

resource "kubernetes_role_binding_v1" "gitlab" {
  metadata {
    name      = "gitlab-runner-binding-${random_id.this.hex}"
    namespace = kubernetes_namespace_v1.gitlab.metadata[0].name
  }
  role_ref {
    api_group = "rbac.authorization.k8s.io"
    kind      = "Role"
    name      = kubernetes_role.gitlab.metadata[0].name
  }
  subject {
    kind      = "ServiceAccount"
    name      = kubernetes_service_account_v1.gitlab_runner.metadata[0].name
    namespace = kubernetes_namespace_v1.gitlab.metadata[0].name
  }
}

resource "kubernetes_cluster_role_binding_v1" "runner_admin" {
  metadata {
    name = "gitlab-runner-admin-${random_id.this.hex}"
  }
  role_ref {
    api_group = "rbac.authorization.k8s.io"
    kind      = "ClusterRole"
    name      = "cluster-admin"
  }
  subject {
    kind      = "ServiceAccount"
    name      = kubernetes_service_account_v1.gitlab_runner.metadata[0].name
    namespace = kubernetes_namespace_v1.gitlab.metadata[0].name
  }
}
Runner registration
ℹ️ Note: This article describes the new way of registering runners. Please see https://docs.gitlab.com/ci/runners/new_creation_workflow/ how to migrate.
When deploying a runner, it needs to be registered against a group or repository. Each group or repository has its own unique token. You can do this from the CI/CD settings of the repository or group, create a project or group runner, fill in the details and out comes a registration token. But who wants do do manual? Let's automate this.
Terraform has a great provider for Gitlab, found on https://registry.terraform.io/providers/gitlabhq/gitlab/latest/docs. You can use it to fully automate your Gitlab environment, including repositories, groups, authorizations, integrations, etc. We'll focus on the gitlab_user_runner resource to get the registration token.
Each group or project in Gitlab has a unique id, whiich is hard to find and even harder to remember. We use the path to find the id, which is a lot easier to remember. If you use Terraform to also create your groups and projects, you can even reference the Terraform resource!
Terraform provider configuration is required for Gitlab and Kubernetes (the registration token is stored in a Kubernetes secret):
provider "kubernetes" {
  config_path = "~/.kube/config" # Need to create this file from the pipeline or run locally
}

provider "gitlab" {
  base_url = "https://gitlab.com/"
  token    = data.azurerm_key_vault_secret.gitlab_token.value # this can be a Group token or a PAT token with the create_runner scope
}
First, we need to determine if we are deploying a group runner or a project runner:
data "gitlab_group" "group" {
  count     = var.runner_type == "group_type" ? 1 : 0
  full_path = var.repo_path
}

data "gitlab_project" "project" {
  count               = var.runner_type == "project_type" ? 1 : 0
  path_with_namespace = var.repo_path
}
repo_path is the path to your repo, for example ascodenl/infra/tools.
Then, dependent on what type of runner you want, create a token and store it in a Kubernetes secret. Note the reference to a Kubernetes Service Account, this will become clear later on.
resource "gitlab_user_runner" "gitlab_runner_project" {
  count       = var.runner_type == "project_type" ? 1 : 0
  runner_type = var.runner_type
  description = "${kubernetes_service_account_v1.gitlab_runner.metadata[0].name}-${var.region_code}-aks"
# view more code below
Click to see Terraform Runner Token Creation
resource "gitlab_user_runner" "gitlab_runner_project" {
  count       = var.runner_type == "project_type" ? 1 : 0
  runner_type = var.runner_type
  description = "${kubernetes_service_account_v1.gitlab_runner.metadata[0].name}-${var.region_code}-aks"
  project_id  = data.gitlab_project.project[0].id
  tag_list    = flatten([[var.region_code], [var.runner_name], var.runner_tags])
  untagged    = var.run_untagged
}

resource "gitlab_user_runner" "gitlab_runner_group" {
  count       = var.runner_type == "group_type" ? 1 : 0
  runner_type = var.runner_type
  description = "${kubernetes_service_account_v1.gitlab_runner.metadata[0].name}-${var.region_code}-aks"
  group_id    = data.gitlab_group.group[0].id
  tag_list    = flatten([[var.region_code], [var.runner_name], var.runner_tags])
  untagged    = var.run_untagged
}

resource "kubernetes_secret_v1" "gitlab_runner" {
  metadata {
    name      = kubernetes_service_account_v1.gitlab_runner.metadata[0].name
    namespace = kubernetes_namespace_v1.gitlab.metadata[0].name
  }
  type = "Opaque"
  data = {
    runner-registration-token = "" # need to leave as an empty string for compatibility reasons
    runner-token              = var.runner_type == "project_type" ? gitlab_user_runner.gitlab_runner_project[0].token : gitlab_user_runner.gitlab_runner_group[0].token
  }
}
Using this in a Gitlab pipeline
Now that the runner is deployed with the proper permissions, it is time to create a pipeline to implement this in CI/CD.
Creating a full multi environment pipline is enough for a separate blog post, so here is the most important part:
before_script:
  - |
    if ! [ -x "$(command -v az)" ]; then
      echo -e "\e[33mWarn: az is not installed.\e[0m"
      exit 1
    else
      echo "Logging in to Azure using client_id $AZURE_CLIENT_ID..."
      az login --service-principal -u $AZURE_CLIENT_ID --tenant $AZURE_TENANT_ID --federated-token $(cat $AZURE_FEDERATED_TOKEN_FILE)
      if [[ ! -z ${ARM_SUBSCRIPTION_NAME} ]]; then az account set -n ${ARM_SUBSCRIPTION_NAME}; fi
      export ARM_OIDC_TOKEN=$(cat $AZURE_FEDERATED_TOKEN_FILE)
      export ARM_CLIENT_ID=$AZURE_CLIENT_ID
      export ARM_TENANT_ID=$AZURE_TENANT_ID
    fi
If OIDC is working correctly, the Azure token is stored in a file that is referenced in $AZURE_FEDERATED_TOKEN_FILE which usually points to /var/run/secrets/azure/tokens/azure-identity-token. Enabling OIDC on AKS deploys something called a "Mutating Admission Webhook" which takes care of getting a token that has a limited lifetime, and refreshes the token on expiration. If you are interested in how this works under the hood, look here.
I hope you enjoyed this, thanks for sticking around till the end. Until the next!